Today was supposed to be a great day. I woke up extra early and jumped into studying as soon as I finished breakfast so I could food blog later.
 |
| Sitting outside and smelling the roses |
I thought it was gonna be easy. I had an easy recipe and all the ingredients (thank god I did not see that pack of seaweed last week). Set the pan on low heat to keep the eggs from cooking too fast. Prepared everything before hand. Tried to take it slowly, step by step.
I was so wrong.
But before we go on and on about my culinary incompetencies, here is today's food tutorial: Korean Rolled Omelettes or Gaeren Mari.
This recipe is so simple it really shouldn't warrant a tutorial at all. But I'm gonna do one anyway because it lets you see how bad I am at multitasking. These pictures are all from my fail first attempt but it's just to give you a general idea of what I'm trying to talk about.
Korean Rolled Omelette with Seaweed
INGREDIENTS:
2-3 eggs (depending on how thick you want it to be)
salt
dried seaweed
vegetable oil for frying
DIRECTIONS:
1. Gather your ingredients and equipment together, like so:
 |
| The line-up. |
3. Set your pan on medium-low heat and let it heat up a bit while you prepare your eggs.
4. Lightly beat your eggs and sprinkle with salt.
5. Pour about 2/3 of the egg mixture into your frying pan. Swirl around to make a even, circular layer. Keep at medium-low to medium heat. Lower is better, I think.
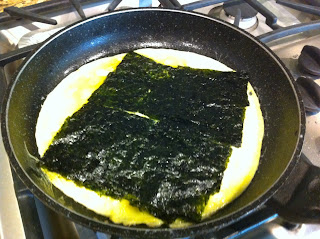
6. Let it firm up on the bottom a bit before adding your single layer of seaweed. Don't add more than one layer because it will fall out after you finish cooking it.
 |
| Terrible picture but you get the point. |
7. After you add your layer of seaweed, pour the rest of the egg on top and let it cook a few more seconds. Don't let the liquid cook out on top or else it won't stay together when you make your folds later.
8. Take your spatula + chopsticks and gently begin folding over into quarters. After every fold, press lightly on your egg to make sure it keeps its shape.
8. Take your spatula + chopsticks and gently begin folding over into quarters. After every fold, press lightly on your egg to make sure it keeps its shape.
9. Continue to cook until your egg is lightly fried all over and you're done!
10. Let it cool a bit before cutting into nice bite size pieces.
10. Let it cool a bit before cutting into nice bite size pieces.
 |
| Yay! (Guess which ones are the fail ones :P) |
So in summary:
- Do your prep work.
- Keep your eggs at low heat so as to better control its cooking time.
- Use only one sheet of seaweed.
- Work quickly and make sure it is still semi-liquid-y on top when you fold your omelette or else it won't hold its shape
- Also since this only takes like 10 minutes of real work, don't multitask and try to do something else at the same time. Unless you are very good at it.
Lessons I learned today:
- Expect problems the first time around and don't freak out.
- It's okay to try again.
- Eggs are delicious no matter how much you think you screwed up.
I think I kinda already broke one of my baking rules by not really thinking through my first attempt and therefore, committing silly errors and also, panicking royally when the first attempt fell through. Maybe it's because I really suck at cooking. Or maybe it's because I'm way too much of a perfectionist. Oh well, such is life. I gotta deal.
Just a heads up, this doesn't mean I won't ever do picture tutorials again. I'll try, I swear. But I don't think it works well with really easy and fast recipes if I don't have someone helping me snap photos as I go.
Or I should really learn to loosen up when I cook. Kitchen freak-outs are no fun.
Now, go enjoy something eggy-licious! :)

No comments:
Post a Comment